How to Format a USB Drive:
The Definitive Guide for Windows, Mac and Chromebook
A new USB drive almost always arrives pre-formatted and ready to use. But there are plenty of reasons to format one anyway: clearing a drive full of old files, fixing a “drive not recognised” error, switching file systems so a drive works across both Windows and Mac, or getting a second-hand drive ready for a fresh start.
This guide walks through formatting a USB flash drive on the three platforms most people use today – Windows 11, macOS Sequoia, and ChromeOS on a Chromebook – plus how to pick the right file system so the drive behaves the way you expect on every device you plug it into.
Before you start
Formatting a drive erases everything on it. Copy anything you want to keep to your computer or cloud storage first – once you click Erase or Format, that data is gone!
Which file system should you use?
Before formatting, it helps to know what you’re choosing between. Windows, macOS and ChromeOS all support the same three common file systems, but each has trade-offs:
| File system | Best for | Max. file size | Works on |
| FAT 32 | Maximum compatibility – cameras, game consoles, car stereos, smart TVs | 4GB per file | Windows, Mac, Chromebook, almost everything |
| exFAT | Everyday use across Windows and Mac, large files (video, backups) | No practical limit | Windows, Mac, most modern Chromebooks and devices |
| NTFS | Windows-only drives, or drives used mainly for backups on a single PC | No practical limit | Windows natively; Mac can read but not write without extra software |
If you’re not sure, exFAT is the safest all-round choice for a drive that needs to move between a Windows PC and a Mac. Reach for FAT32 only if an older device specifically requires it, and use NTFS if the drive will live permanently on a Windows machine.
How to format a USB drive on Windows 11
Windows 11’s File Explorer is the quickest way to format a drive for most people.
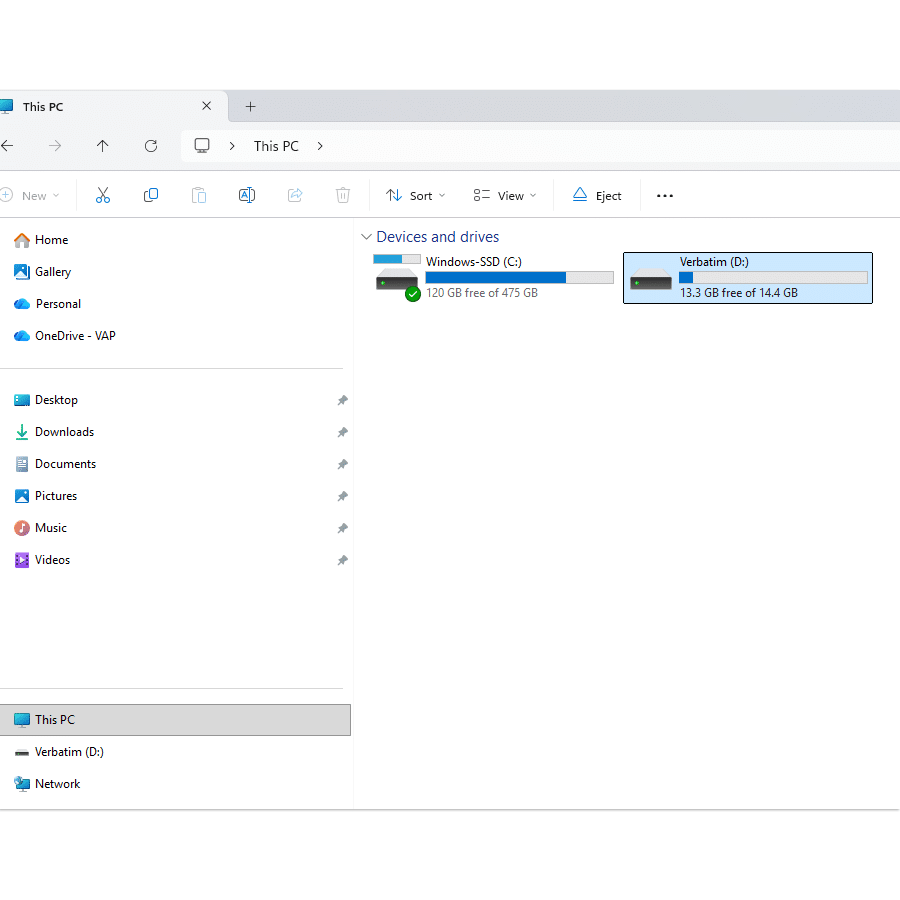
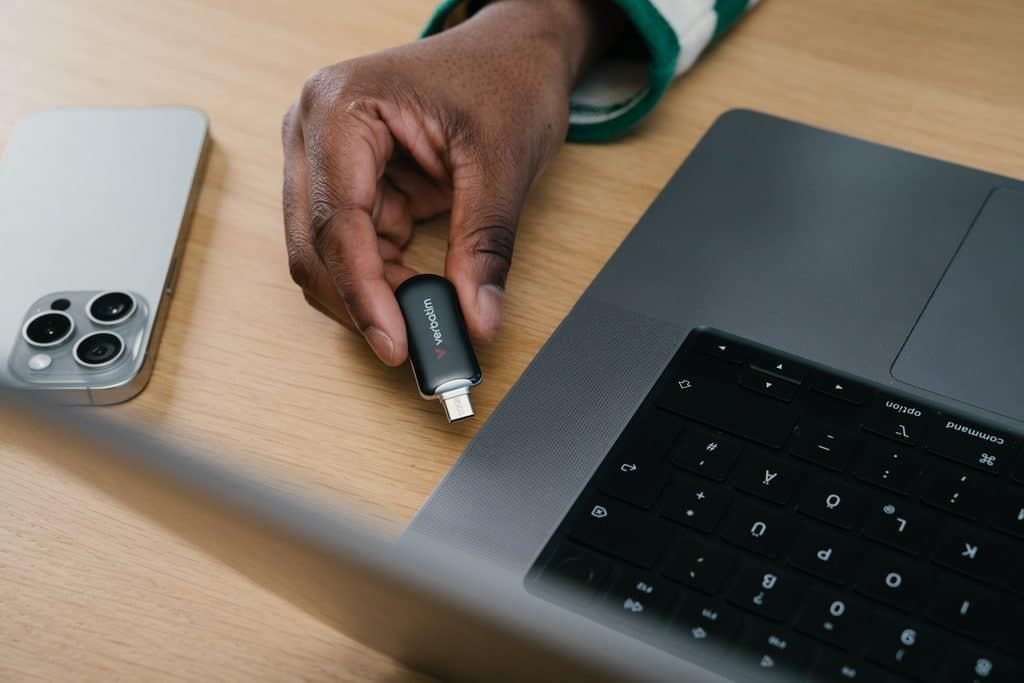
- Plug the USB drive into your PC and wait a few seconds for it to be detected.
- Press Windows + E to open File Explorer, then select This PC in the left-hand pane.
- Under “Devices and drives,” find your USB drive. Check the drive letter and capacity carefully – formatting the wrong drive will erase the wrong data.
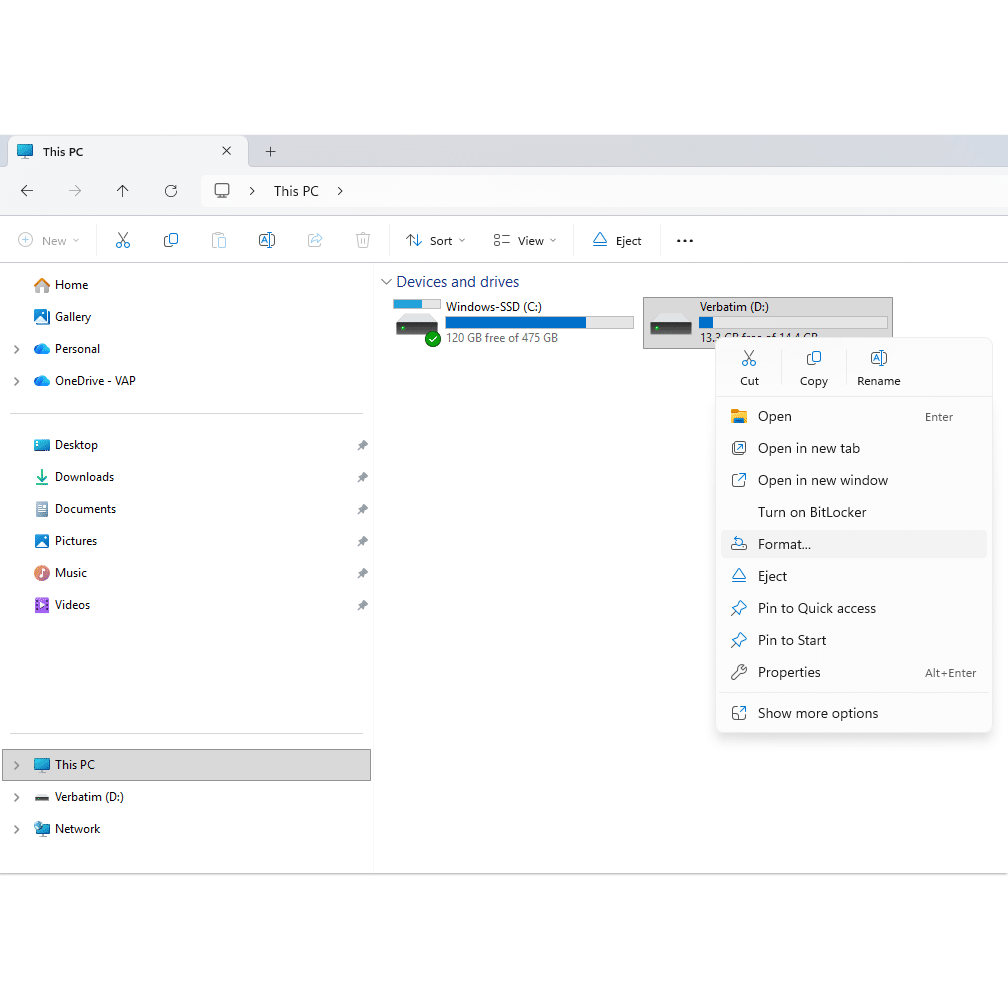
- Right-click the drive and select Format. (On some Windows 11 builds you may need to click Show more options first.)
- In the Format window, open the File system drop-down and choose exFAT, NTFS, or FAT32 based on how you’ll use the drive.
- Leave Allocation unit size on its default setting unless you have a specific reason to change it.
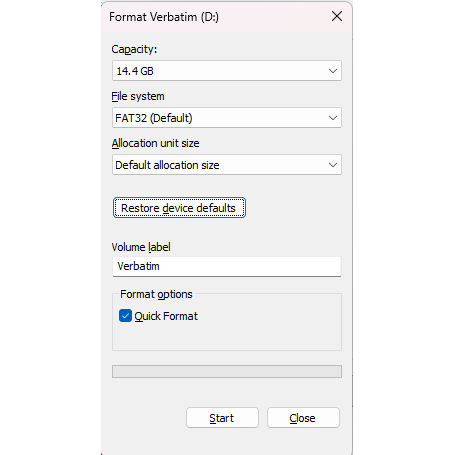
- Enter a name for the drive under Volume label.
- Tick Quick Format (this is fine for almost all everyday use – a full format is only needed if the drive is showing errors).
- Click Start, then OK to confirm. The drive will be ready in a few seconds to a couple of minutes, depending on its size.
A note on FAT32 and larger drives: Windows has traditionally capped FAT32 formatting at 32GB through File Explorer. A 2026 Windows update (KB5083631) raised the FAT32 limit to 2TB when formatting via the command line on Windows 11 24H2 and 25H2, but this doesn’t apply to every build, and File Explorer may still cap out at 32GB depending on your version. If you need FAT32 on a larger drive and File Explorer won’t offer it, that’s why – try the command-line method (via diskpart) on an up-to-date 24H2/25H2 system instead.
If the drive doesn’t show up in File Explorer: try Disk Management instead. Right-click the Start button, select Disk Management, find the drive, right-click its volume and select Format. This also works if a drive shows 0 bytes of capacity or throws a write-protection error, though in that case, check for a physical write-protect switch on the drive first.
How to format a USB drive on macOS Sequoia
On a Mac, formatting is handled through the built-in Disk Utility app.
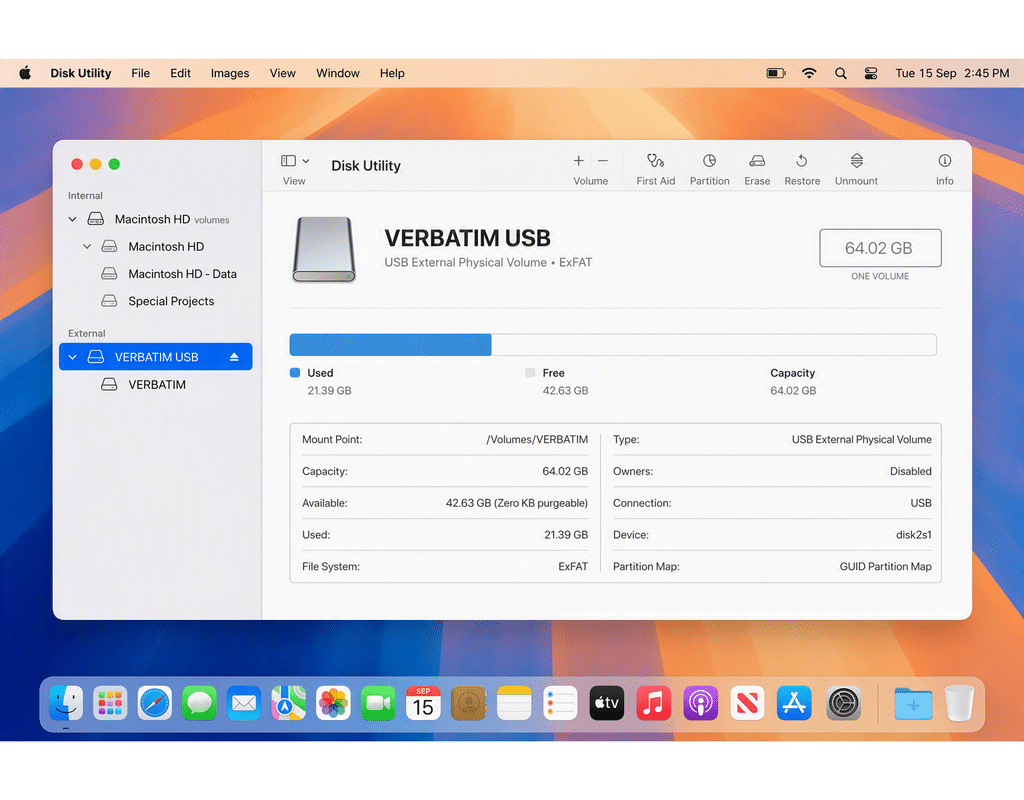
- Plug the USB drive into your Mac.
- Open Disk Utility – the fastest way is Spotlight (Command + Space, then type “Disk Utility”), or go to Finder > Applications > Utilities > Disk Utility.
- In the sidebar, click View and choose Show All Devices if you don’t already see your drive listed.
- Select your USB drive from the sidebar – choose the top-level device (the drive itself), not just the volume underneath, so you can also set the partition scheme.
- Click Erase in the toolbar.
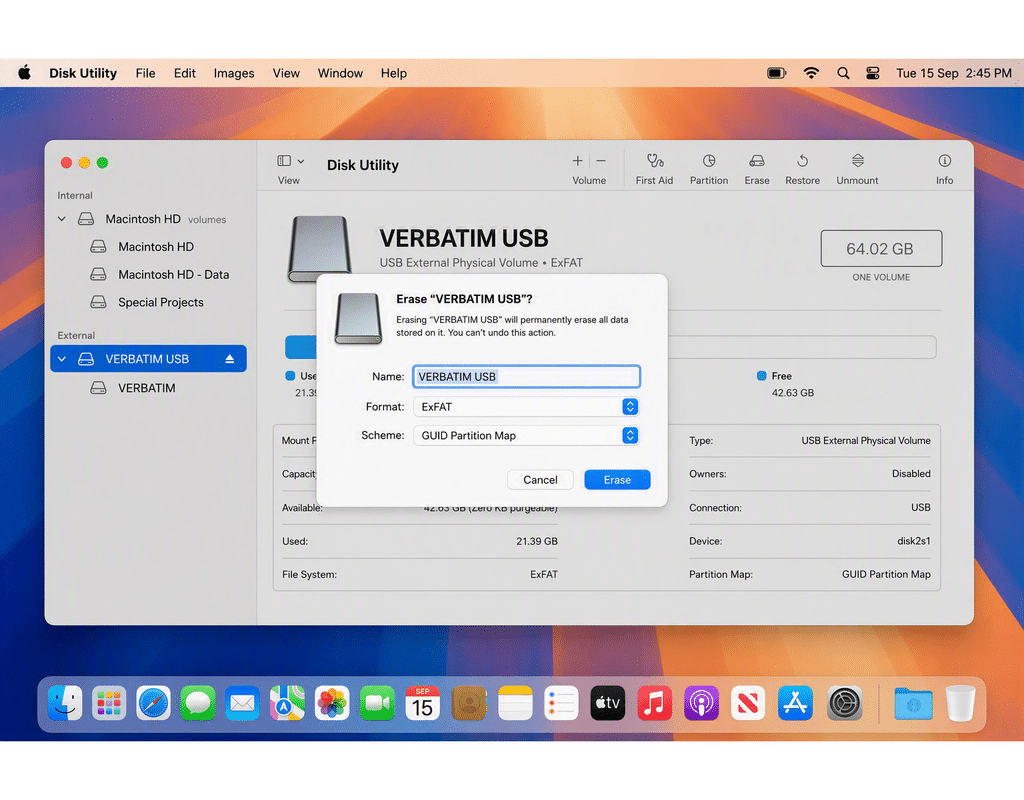
- Give the drive a name.
- Choose a Format: exFAT for cross-platform use, MS-DOS (FAT32) for maximum compatibility with older or non-computer devices, or APFS/Mac OS Extended (Journaled) if the drive will only ever be used with a Mac.
- Choose a Scheme: GUID Partition Map for any modern Mac.
- Click Erase, then wait for the process to finish – don’t disconnect the drive or use it for anything else while this runs.
- Click Done, then quit Disk Utility.
Worth knowing: macOS can read NTFS-formatted drives but can’t write to them without third-party software, and Disk Utility won’t offer NTFS as a format option at all. If a drive needs to work on both Windows and Mac, exFAT is the format to reach for.
How to format a USB drive on a Chromebook
ChromeOS formats external drives through the built-in Files app – no extra software needed.
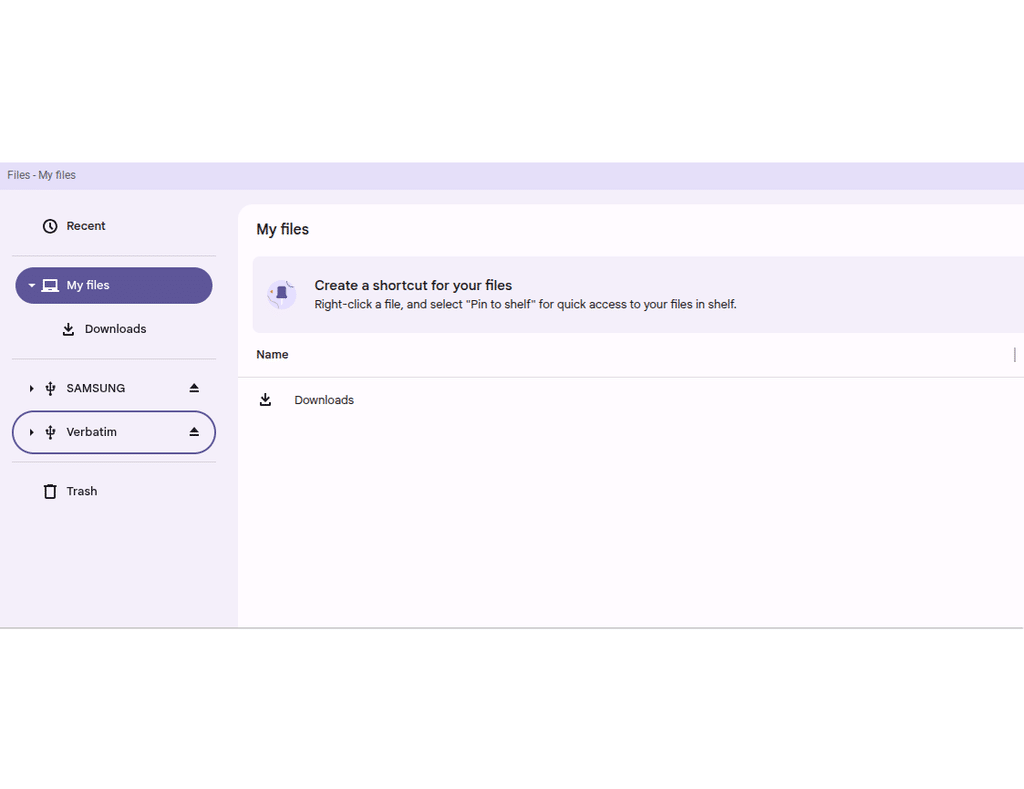
- Plug the USB drive into your Chromebook.
- Open the Files app from the Launcher (or press Alt + Shift + M).
- In the left sidebar, find your USB drive and click it to confirm it’s the right one.
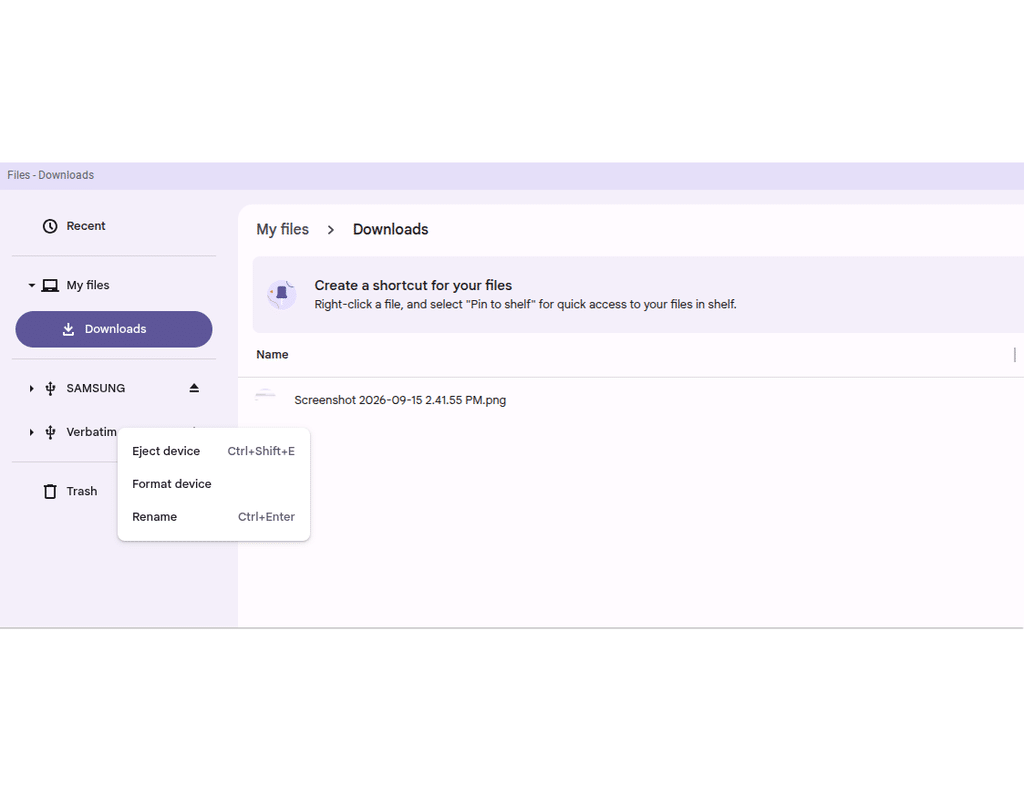
- Right-click the drive’s name in the sidebar (or use the three-dot menu in the top-right corner of the Files window).
- Select Format device.
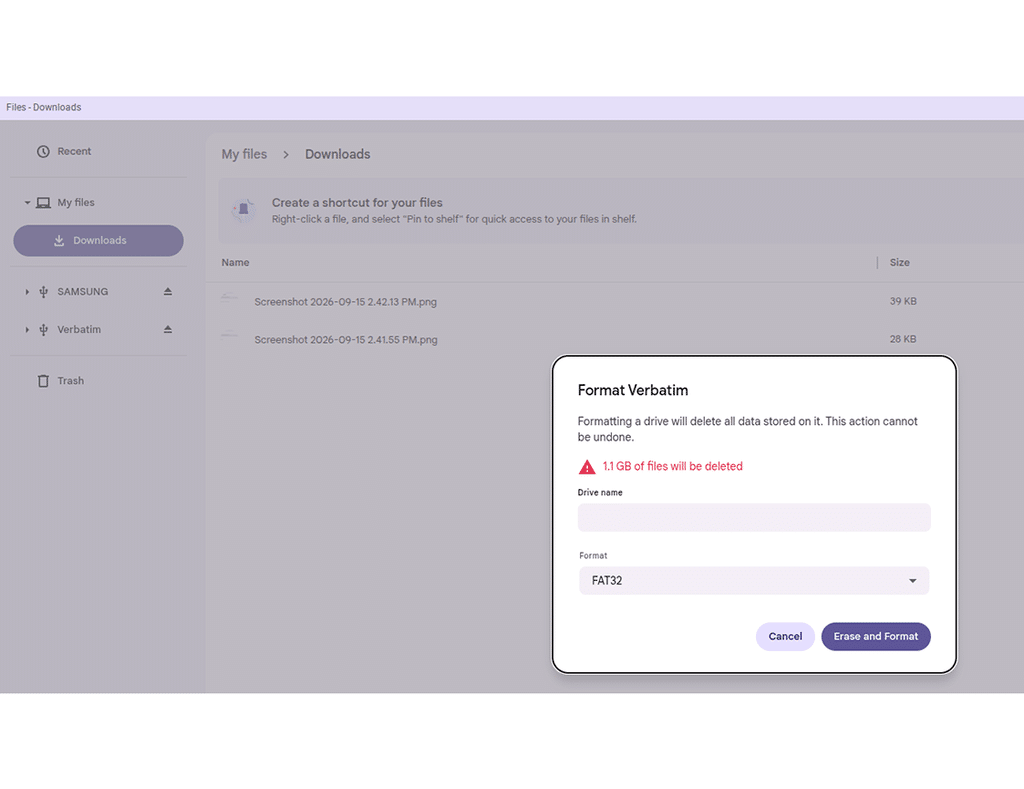
- Choose a file system if prompted – FAT32 is typical for smaller drives, exFAT for drives over 32GB or if you’re storing large files like video.
- Click OK to confirm.
- Don’t remove the drive until ChromeOS confirms formatting is complete.
Chromebook formatting options are more limited than Windows or Mac – you generally can’t choose NTFS, and available file systems can vary by device and ChromeOS version. If a drive won’t format or the option is greyed out, formatting it first on a Windows PC or Mac and then using it on the Chromebook is the more reliable route.
Quick Troubleshooting
- Drive not showing up at all: try a different USB port (some front-facing ports on desktops don’t supply enough power), a different cable if it’s USB-C, or another computer to rule out a failing drive.
- “Write protected” error: check for a physical write-protect switch on the drive itself before assuming it’s a software issue.
- Format option greyed out or fails partway through: on Windows, try Disk Management instead of File Explorer; on Mac, make sure you’ve selected the drive itself rather than a volume.
- Capacity looks smaller than advertised: this is normal – manufacturers list capacity in decimal (1GB = 1,000,000,000 bytes) while your computer reports it in binary, so a “64GB” drive will show as roughly 59GB of usable space. This isn’t unique to any one brand.
Whatever file system you land on, having a reliable drive underneath it matters just as much. Explore Verbatim’s USB Drive range for USB-A and USB-C options built for everyday backups, transfers, and storage on the go.
Frequently asked questions
Use exFAT if the drive is 32GB or larger, or if you’ll be storing files bigger than 4GB. Use FAT32 only if an older or non-computer device (like a car stereo or older game console) specifically requires it.
A standard format wipes the file system and file table, which removes most malware along with everything else on the drive. It’s not a guaranteed disinfection method for firmware-level threats, but for everyday use it’s an effective reset.
No – formatting is designed to erase the drive’s contents. Back up anything you want to keep before you begin.
Apple’s Disk Utility doesn’t support formatting drives as NTFS. Mac can read NTFS drives but not write to them. If you need NTFS, format the drive on a Windows PC, or use third-party NTFS software on the Mac.
exFAT. It’s supported natively by both operating systems, has no practical file size limit, and doesn’t need extra software.